• Home
  • About
  • Contact
  • Skip to main content
  • Skip to primary sidebar

Fril.li

🧶 London’s craft scene 🧷 Craft workshop reviews ✂️ Craft tutorials

Hide Search
You are here: Home / Craft Tutorials / How to make lovely decoupage cloth hangers

How to make lovely decoupage cloth hangers

Aylin · March 27, 2019 · 2 Comments

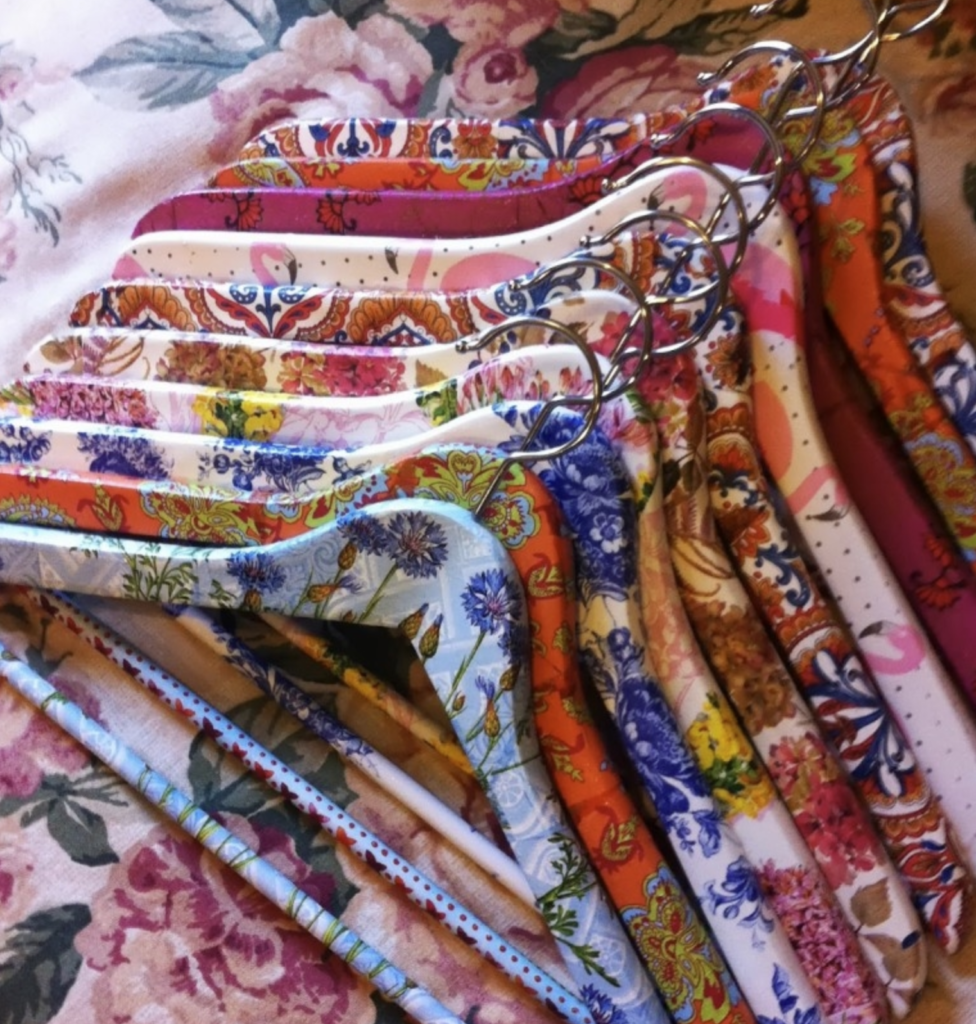
You’ll love these DIY decoupage wooden clothe hangers. If you already know how to make decoupage pieces, you’ll find it easy. If you don’t, let us try to explain it:

Materials:

You’ll need classic wooden hangers. Besides these, you’ll use decoupage glue or Mod Podge, a wide crafts brushes, large napkins, sandpaper, acrylic craft paint and scissors of course.

  • First, you need to separate the napkin. You’ll only need one layer. It’ll be very thin, so be careful and gentle.
  • Sand the hangers carefully. Sanding gives the wooden objects a smooth a better surface for the upcoming applications. You can paint the hangers with 2 layers for a better result. Good idea to wait between layers for drying. You can always choose white or at least a very light colour.
  • Then, cut out the parts you want to use. You’ll need large pieces to cover the whole hanger. Flowers will look good.
  • Brush a thin coat of decoupage on the hanger with your brush, then place your napkin pieces. Be careful and try not to have pots or air bubble voids. Then wipe your napkin gently with your brush. Be patient.
  • Once dry, put one layer of glue or Mod Podge on top of it. Leave ’til completely dry. Then, repeat one or two more times.
  • Now all you need is to allow your pieces to dry for a couple of hours, or a day to be exact. You can hang them since they already are hangers!
  • Enjoy!

Filed Under: Craft Tutorials Tagged With: decoupage

Avatar photo

About Aylin

I am just another craft enthusiast. One thing though: The founder of the leading craft website in Turkey. Now I've started a baby craft blog in London, too. Let's follow this, will you? Promise, I'm going to show you useful and pretty things.

Reader Interactions

Comments

  1. علاج تطويل الذكر says

    April 26, 2019 at 3:20 am

    Howdy! I’m at work surfing around your blog
    from my new iphone! Just wanted to say I love reading through your blog and look forward
    to all your posts! Keep up the great work!

    Reply
    • Avatar photoAylin says

      April 30, 2019 at 11:50 am

      Thank you, you’re so kind!

      Reply

Leave a Reply Cancel reply

Your email address will not be published. Required fields are marked *

This site uses Akismet to reduce spam. Learn how your comment data is processed.

Primary Sidebar

Instagram

Follow on Instagram

Recent Posts

  • Review: Knitting & Stitching Show
  • Review: Punch Needle Embroidery Workshop at Tea and Crafting
  • How to distress wood with oil paint
  • Review: Macrame Headband/Belt – Mini Workshop
  • Cool and easy infinity cowl – free pattern

Categories

  • Craft Ideas
  • Craft Tutorials
  • London Craft Scene

Archives

  • October 2019
  • June 2019
  • May 2019
  • April 2019
  • March 2019

Copyright ©2019 · Fril.li - Privacy Policy

We use cookies to ensure that we give you the best experience on our website. If you continue to use this site we will assume that you are happy with it.Ok